Understanding the Physical Dimensions of a Standard Coffee Mug
Typical Diameter and Height for an 11-Ounce Vessel
Over the years, I have handled countless blanks, and the true capacity of a mug often hides in plain sight. The 11oz mug printing size puzzle begins with the vessel’s physical shape, not the design file. Most standard 11-ounce coffee mugs stand roughly 3.5 inches tall, with a diameter of about 3.2 inches across the top. However, these measurements are not universal; subtle variations exist between manufacturers. This is where the seemingly uniform ceramic surface can betray an unprepared designer.
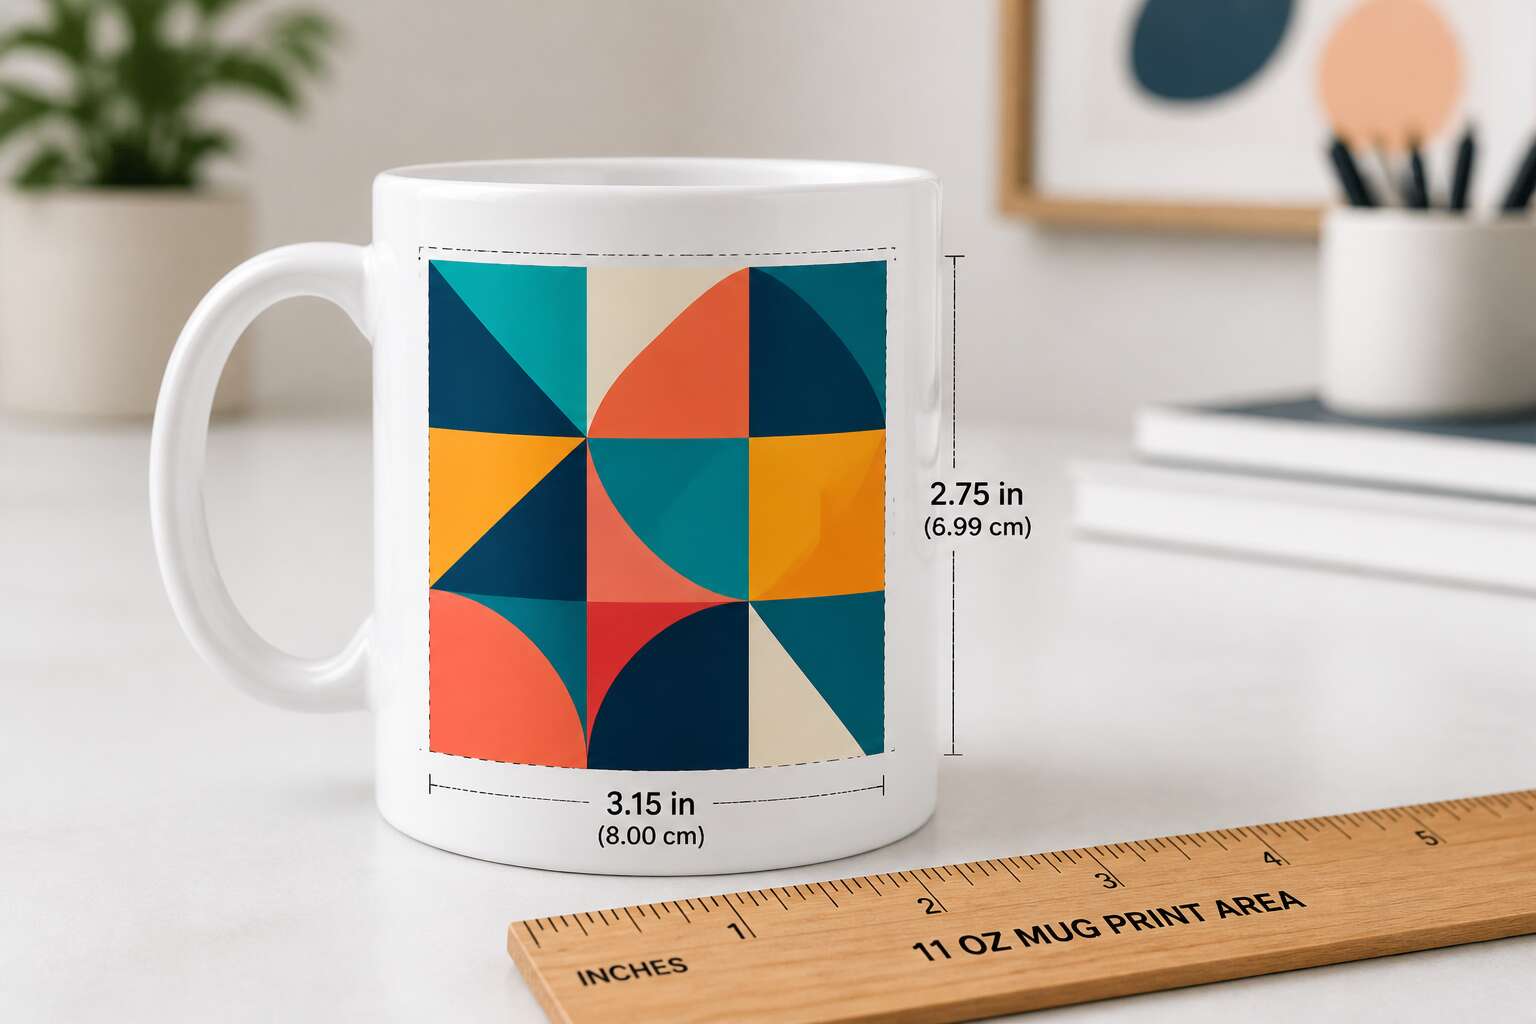
The wall of the mug typically tapers slightly toward the base, which creates a subtle curve. This geometry is the primary constraint for your artwork. Because of the taper, the ideal printing area is a flattened rectangle that wraps around the middle. The usable height for a print is often around 2.5 to 3 inches, leaving a comfortable margin from both the rim and the base. Here are the standard physical benchmarks we use for reference:
- Top diameter: approximately 82mm
- Base diameter: approximately 62mm
- Full height: approximately 95mm
- Handle width: adds roughly 30mm to the total footprint
The exact curvature of an 11oz mug printing size affects how the ink stretches across the surface. A design that looks perfect on a flat screen can distort at the edges if it is wrapped too tightly around the sides. You are not just placing an image on a canvas; you are mapping it to a cylinder with a gentle inward slope. Understanding these physical attributes is the first step to ensuring your final product does not suffer from unsightly cropping or misaligned seams. The numbers are the foundation, but the shape is the true master of the final result.
How Wall Thickness Influences Outer Measurement
Few consider the ceramic wall between the liquid and the label. Yet that wall defines the 11oz mug printing size. A standard mug holds 11 ounces, but its outer surface expands with every millimetre of material. For the same internal volume, a thicker wall pushes the outside diameter outward, changing how a design wraps.
Typical wall thicknesses for commercial mugs:
- Rim: 4mm
- Midbody: 6mm
- Base: 8mm
That gradient mirrors the physical taper. The base holds extra ceramic for stability, so the lower print region sits flatter than the top. When you measure an 11oz mug printing size, you measure the shell, not the capacity. A 1mm difference in wall thickness adds roughly 6mm to the outer circumference. This shifts the curvature of the print area. I have seen two mugs with identical internal volume look different!
Comparing Straight-Sided and Curved Profiles
The mug sits there, a humble cylinder of fired earth. Yet its true form, the actual 11oz mug printing size, is a study in geometry. Most commercial mugs are not perfect cylinders; they possess a subtle, internal contour. The walls often taper slightly from the base toward the lip, a design choice for both stacking efficiency and comfortable grip. This means the diameter at the top is measurably different from the diameter at the bottom. These physical dimensions create a unique canvas. The printing space is a curved surface that narrows, and your artwork must acknowledge this shift to sit correctly.
Comparing a straight-sided profile against a curved one reveals the core of the challenge for any designer. A straight-sided mug is a true cylinder. Its circumference remains constant, allowing a design to wrap from seam to seam with uniform tension. The curved profile, however, introduces a slope. The lower portion of the mug where the walls meet the base is where the transition occurs, often becoming more rounded. This changes the focal distance from the viewer’s eye.
– The printing zone on a straight wall is level, reducing the risk of horizontal distortion.
– A curved wall requires the artwork to be sized with a buffer for the bottom curve, preventing the design from falling off the edge.
The difference between these two shapes dictates the final look. On a curved mug, the 11oz mug printing size might measure 8.5cm across and 9cm tall, but the effective printable area is smaller to avoid the sharp curvature near the bottom. I prefer working with the curve. It gives the design a sense of volume, making the decal feel like part of the object, not just a sticker slapped on the side.
Why Exact Capacity Does Not Equal Exact Surface Area
Understanding the physical dimensions of a standard coffee mug reveals a frustrating truth: the 11oz mug printing size is not a calculation you can derive from its volume. Two mugs can hold exactly 330ml, yet one offers a taller, narrower surface while the other sits squat and wide. Capacity measures internal space, while your artwork occupies external surface area. This discrepancy matters more than most clients expect. I have measured mugs with identical liquid volumes that differ by nearly two centimeters in wrap-around width.
- Volume depends on internal depth and diameter, but printing surface depends on outer curvature and available blank space.
- Handles consume no print area, yet they affect how the mug is held and where your design can safely end.
- Base and rim contours reduce the usable zone even when the total height seems generous.
The actual distance from the top of the handle to the bottom curve often dictates the 11oz mug printing size more than the capacity ever will. That is why I always request a physical sample before finalizing any layout!
Mapping the Ideal Printable Area
Safe Zone vs. Full-Bleed Printing
The decision between a confined safe zone and a full bleed design is the first true test of your artwork’s ambition. For an 11oz mug printing size, the safe zone is your anchor. It typically sits about 20 millimeters from the bottom rim, ensuring the base of your design remains visible during everyday use. This area guarantees that critical elements like logos or slogans are never lost to a shadow or a careless grip.
Choosing full bleed is a commitment to the edges. The image is designed to wrap completely over the curved surface, which requires a standard 10 millimeter bleed allowance on all sides. This approach creates a dramatic, immersive effect, but it demands precise file setup. The reality is that the mug’s curvature will distort the graphic near the edges, a quirk of the process that cannot be ignored if you want a clean finish.
– Safe zone: best for typography and essential contact details.
– Full bleed: optimal for patterns, landscapes, and bold color blocks.
– Wrap-around: ensures the design reads as a continuous narrative.
There is a certain romance in a design that flows seamlessly over the lip of the vessel. The full bleed method offers a canvas without borders, where the 11oz mug printing size becomes a 360 degree story. However, this beauty is fragile. Without the correct 3mm overprint, a hairline gap will crown your masterpiece, a stark reminder that even the most beautiful dreams need careful margins. The choice is yours: the safety of clarity or the allure of the infinite.
Distance from Rim and Handle Constraints
A 2 millimeter error at the rim can scrap an entire batch of mugs. That is why the 11oz mug printing size respects two fixed boundaries: the handle and the top lip. The handle interrupts the smooth rotation of the printing jig, so artwork must stop roughly 8 millimeters from each joint. The top rim demands a 10 millimeter clearance to prevent ink from creeping over the edge.
- Top rim clearance: 10 mm minimum
- Handle side gap: 8 mm per joint
- Front face bias: keep logos between 12 o’clock and 3 o’clock
Mapping the printable area means respecting these fixed measurements. The curve near the handle distorts more than you expect, so test prints reveal the true boundaries before you commit to a full run.
Accounting for Taper and Curvature Distortion
On a tapered mug, the upper circumference exceeds the base by nearly 15 percent. This transforms the printing surface into a truncated cone, a shape that resists flat artwork. Mapping the ideal printable area for the 11oz mug printing size means projecting designs against the steepest angle, where curvature distortion peaks.
The lower third of the body shows the most aggressive bending. A straight rule on a digital mockup curves visibly when wrapped around the glaze. Designers who work with the 11oz mug printing size measure the chord width rather than the surface distance to anticipate how type will compress.
The printable area behaves like a map projection, trading linear accuracy for circular fit. Three anchor measurements guide this mapping:
- the upper sweep where the taper begins
- the midpoint radius that balances the curve
- the basal circumference that flattens the artwork
Each anchor shifts the perceived size of the final print.
Positioning for Left-Handed and Right-Handed Users
Left-handed drinkers make up roughly 10 percent of the population, yet their grip reshapes the visual plane of a mug. The handle orientation guides how the body is held. Right-handed users wrap the left hand around the lower left quadrant, while left-handed users cover the lower right quadrant with equal consistency.
Mapping the 11oz mug printing size means positioning artwork where the fingers do not travel. In my experience, the handle center serves as the most reliable fixed reference for both grips:
- Focal points above the midpoint stay clear of curled fingers.
- Critical text within the central third avoids palm pressure.
The gap between the thumb and forefinger opens a narrow viewing window on both sides, making the upper half of the vessel the natural home for any design.
Design Specifications That Impact Print Quality
Minimum Resolution and DPI Requirements
Most artwork fails on ceramic not because of design, but because of insufficient resolution. I see this constantly in production. The 11oz mug printing size demands a minimum of 300 DPI at full scale to preserve sharpness. Anything less introduces visible pixelation, especially around text and fine linework.
For the 11oz mug printing size, a raster file should measure at least 1500 by 2000 pixels. Vector files bypass this limitation entirely. They scale infinitely without quality loss. However, embedded photographs or gradients still depend on raster resolution for their final appearance.
Typical DPI thresholds for ceramic decoration:
– 150 DPI suits large, bold graphics
– 300 DPI handles detailed illustrations
– 600 DPI accommodates tiny text or intricate patterns
Colour profiles also influence perceived sharpness. CMYK conversion shifts vibrancy compared to RGB previews. Ceramic inks absorb differently than paper, which alters edge definition slightly. A file prepared at adequate DPI still relies on accurate colour handling to deliver crisp results.
Recommended Color Spaces: CMYK vs. Pantone
On an 11oz mug printing size, colour is identity. The difference between CMYK and Pantone often determines whether a brand feels trustworthy or counterfeit. Most digital printers use CMYK, which can appear muted once fired onto ceramic glaze. Pantone offers spot colour matching, which ensures precise hues when exactness matters. In my experience, many clients insist on Pantone for logos yet fail to realise that ceramic inks shrink and darken during firing. This changes the final appearance. The result is that printed colour no longer matches the approved proof.
Consider these practical distinctions:
- CMYK suits photographic content where tonal range matters more than exact reproduction.
- Pantone suits solid blocks, logos, and branded elements demanding consistency.
Each choice affects the final product. A mismatched red alters how customers perceive a brand’s energy or reliability. Designing for an 11oz mug printing size requires accepting that colour is not permanent until the kiln opens.
File Formats That Preserve Vector and Raster Layers
Design specifications that impact print quality often hide in the file format. An 11oz mug printing size rewards precision. Vector files, such as AI or EPS, hold every contour as mathematical data. They survive scaling without losing edges. Raster images, such as PSD or TIFF, carry pixel depth. They preserve photographic texture but demand exact resolution before the kiln opens.
The real work sits in the layers. A properly layered file lets the printer isolate the white underbase, the cyan, the magenta, and the protective overglaze. Flattening ruins this. It blends everything into one stubborn block. Keep these details intact:
- Text converted to outlines
- Spot colours separated on their own layers
- Transparent backgrounds instead of white boxes
When you send a flattened JPEG, you lose control. A layered TIFF or PDF gives the printer room to adjust each element for the 11oz mug printing size without sacrificing sharpness!
Bleed Size and Margins for Edge-to-Edge Artwork
Edge-to-edge artwork on an 11oz mug printing size demands a bleed that many designers underestimate. The printable surface extends beyond the visible ceramic face. Add 3 millimetres of extra artwork on every side so the transfer sheet covers the full surface, even when the mug shifts during firing. Without this allowance, a white sliver appears at the rim or handle seam.
Margins protect the elements that cannot afford distortion. Text and logos need a 5 millimetre buffer from the curved edges. Ink wraps on a cylinder, and that wrap shifts appearance. These changes are subtle, but they affect legibility.
The standard setup includes:
- A 3mm bleed beyond the visible print area
- A 5mm margin for text and essential logos
- A fully extended background for continuous patterns
Production runs of the 11oz mug printing size follow these same specifications from the first print to the final firing.
Handling Gradients and Fine Text Across a Curve
Gradients across the 11oz mug printing size behave differently than they do on flat stock. The curved substrate compresses the color transition along the horizontal axis, making abrupt stops visible where the ink density changes. Fine text suffers from the same cylindrical distortion, particularly near the handle seam where the taper accelerates.
A gradient that looks smooth on screen can band when fired at high temperatures. The ceramic coating absorbs pigment unevenly, especially in lighter tones. A graduated blend that shifts more than 10 percent per 10 millimetres will expose every flaw.
For fine text, the limitations are consistent:
– Serif fonts below 8 points blur at the edges
– Thin strokes disappear where the curve is steepest
– Tracking needs a slight increase to prevent crowding
The 11oz mug printing size demands this attention because the visual error magnifies across the full circumference.
Common Pitfalls When Preparing Artwork for Cylindrical Surfaces
Stretching and Distortion Around the Rim
The rim of a cylindrical vessel is a master of optical illusion, bending flat artwork into a convex panorama. As artwork wraps toward the lip, vertical lines often appear to bow outward, creating a barrel effect that can make a straight logo look positively rotund. This distortion is most pronounced in the final few millimetres, where the surface angle changes most drastically, a cruel trick for any designer.
The 11oz mug printing size offers a canvas that is both generous and deceptive. Elements placed too close to the top edge can suffer from a “wrap-around” wobble, where the eye perceives a gentle wave in what should be a rigid line. This is not a defect in the print itself, but a consequence of the viewer’s perspective on a curved form. The glaze’s gloss can further exacerbate this by reflecting light in a way that highlights the physical bend, making the distortion appear more severe than it actually is.
Certain design elements are more vulnerable to this phenomenon than others. The following factors commonly contribute to the issue:
– Thick, chunky borders that invite the eye to follow their path around the curve.
– Horizontal rules or stripes that are meant to appear perfectly parallel to the rim.
– Large circular shapes, which can easily morph into ellipses when placed near the upper edge.
The challenge lies in anticipating how the material will manipulate the design. A single pixel of data on a flat screen becomes a measurable millimetre of physical space on a mug’s wall. When a design is forced to its limits, the natural curvature takes over, and the result is a visual compromise. Accepting this quirk of geometry is the first step towards creating artwork that looks intentional, rather than merely stretched, on the finished ceramic piece.
Avoiding Critical Elements Near the Handle Seam
The handle seam presents a physical obstacle that catches many designers off guard. Where the handle merges with the mug’s cylindrical wall, the surface is rarely flush. A subtle ridge or indentation interrupts the even glaze. Critical artwork placed across this junction appears broken or deformed. The 11oz mug printing size provides enough surface area to position graphics clear of this zone, but errors occur when designs are scaled to the extreme edges.
Elements that should never intersect the seam:
- Barcodes or QR codes requiring a perfectly flat scanning surface
- Small, dense text that becomes illegible when crossing an uneven ridge
- Continuous lines or borders that demand an unbroken visual path
A logo or emblem that spans the seam sits awkwardly on the final product. Shadows collect around the transition and obscure fine detail. The 11oz mug printing size rewards careful placement, yet the seam remains a permanent feature of the vessel. Designers who ignore its presence deliver a finished piece that looks unintentionally fractured.
Incorrect Wrap Length for a Tapered Body
On a tapered mug, the wrap length at the rim is longer than at the base. The 11oz mug printing size fools designers into using a single rectangular template. That creates a mismatch where artwork bunches near the bottom or leaves a gap at the top.
A horizontal band that looks straight in your design file will appear to curve downward at the edges. A logo that sits flush against the rim may drift away as it travels down the taper.
- Measuring the circumference at both the top and bottom before setting the canvas size
- Using a curved template that mirrors the actual taper of the vessel
The 11oz mug printing size gives you 8.5 inches of usable width at the rim, but that number shrinks as you move downward. Ignoring the taper means aligned artwork will look like it was applied by someone who had never seen a mug.
Overlooking the Impact of Gloss and Matte Finishes
Gloss and matte finishes change how your artwork reads on a cylindrical surface, yet they rarely factor into the initial design phase. The 11oz mug printing size determines the physical canvas, but the finish determines what the eye actually perceives. A glossy coating intensifies contrast and saturation, which can make fine text appear sharper or, conversely, highlight every imperfection in the gradient. Matte surfaces scatter light instead of reflecting it, softening the overall appearance but also dulling vibrant colours.
Consider this when reviewing proofs:
- Gloss finishes amplify the visibility of white ink under translucent areas.
- Matte finishes can cause dark backgrounds to look slightly chalky.
The 11oz mug printing size gives you the dimensions, but the finish dictates the final mood. Designers who ignore this relationship often discover their carefully balanced colours shift dramatically once the mug leaves the printer. The difference is subtle in a digital mockup and unmistakable in your hands.
Practical Guidelines for Communicating With Your Printer
Providing Accurate Artwork Measurements in Inches or Pixels
When you contact your printer about an 11oz mug printing size, bring a precise set of measurements. Vague descriptions like “the full front” leave too much room for error. State your artwork dimensions in inches or pixels, and confirm whether those numbers refer to the full-bleed area or the safe zone.
I recommend giving both the physical size and the pixel dimensions, since this removes ambiguity about resolution. A design measuring 8.5 inches wide by 3 inches tall should be supplied at 300 DPI, which translates to 2550 pixels by 900 pixels. Supplying both lets the printer verify your artwork matches the 11oz mug printing size without guessing.
- State measurements as width by height.
- Write the pixel dimensions beside the inch dimensions.
- Ask whether the printer wants the numbers to include the bleed extension.
Requesting a Physical Proof or Digital Mockup
Most print errors surface after the ink is fired, not before. A physical proof gives you a tangible object to rotate, inspect, and hold under different light. A digital mockup is faster and cheaper, but it cannot show glaze interaction or handle shadowing. For the 11oz mug printing size, both options have merit when you ask the right questions.
When you commission either proof, make specific demands:
– Request a complete wrap view, including the seam area and handle proximity.
– Require true-scale rendering, or clearly labelled dimensions.
– Ask that safe zone boundaries remain visible for text placement verification.
A good printer will also flag curvature distortion before you approve. Trust me, that catches many mistakes! When requesting either proof, supply the exact artwork dimensions and the bleed extension you used. This clarity prevents costly reprints of the 11oz mug printing size.
Clarifying Pantone Color Matching Expectations
Pantone codes look absolute on a monitor, but ceramic surfaces bend them. A fired glaze can shift a hue by several shades, especially on a curved vessel. When you communicate with your printer about the 11oz mug printing size, avoid saying only “match this.” Explain whether you need strict brand compliance or a close visual match.
Provide a physical Pantone chip and ask for a fired sample under consistent lighting. Then define an acceptable tolerance, such as a Delta E under 2. You should also clarify the finish, because gloss deepens contrast while matte washes out color.
Finally, put these expectations in writing.
- State the exact ink system and catalyst.
- Specify the glaze recipe and firing temperature.
- Agree on a reprint policy for color drift.
This level of clarity prevents the most expensive mistake in the 11oz mug printing size: assuming a code is a contract. Your printer can meet expectations, but only when you articulate them.
Confirming Placement Options: Wrapped, Centered, or Offset
Placement isn’t a decorative afterthought. Confirm the 11oz mug printing size, then confirm where the design sits on the vessel. Wrapped art runs edge to edge; centered art sits opposite the handle; offset art breaks symmetry. Each option changes screen registration and print pressure.
Quantify your intent. For wrapped, state how many millimetres from the rim art should start and whether it overlaps the handle seam. For centered, say whether the centreline aligns with the mug’s front face or the handle’s midpoint. For offset, provide a horizontal distance from centre.
Ask these three questions to finalise placement:
- Full wrap or a single pane?
- Handle seam boundary or avoid?
- Bottom curve intrude or straight horizon?
Vague placement requests generate costly reprints. A printer cannot infer your intended relationship between the design and the handle seam.
Asking About Template Compatibility and Layer Naming
Most reprints trace back to a mismatch between your file and the printer’s template. I always ask directly whether their template matches the exact 11oz mug printing size or a generic approximation. A template for a curved surface differs from one for a flat mockup, so request the actual production file, not a screenshot.
Layer naming seems trivial until a split file arrives with ten unnamed layers. Name every layer by its function: Artwork, Bleed, Gloss Mask, Handle Seam. This removes guesswork.
When you receive the template, verify these points:
– Does the template include the handle seam location?
– Are the safe zone and bleed guides locked or editable?
– Are spot colours already defined?
If the printer hesitates on any of these, pause the order. A clear template prevents the most common 11oz mug printing size errors before they cost you a production run.




0 Comments